Trekking Kilimanjaro for 6 days involves choosing between popular routes like Machame, Marangu, and Rongai, each offering distinct experiences in terms of scenery, acclimatization, and accommodation. The Machame route is often favored for its scenic beauty and higher success rates due to its gradual ascent profile, though it typically uses camping. The Marangu route, known as the ‘Coca-Cola’ or ‘tourist’ route, is unique for its hut accommodations and its steeper, more direct ascent, which can challenge acclimatization. The Rongai route approaches from the north, offering a different landscape and often being a drier option, making it suitable for certain times of the year. For a 6-day climb, success rates can be lower on any route compared to longer itineraries, making careful planning, proper acclimatization, and choosing a reputable operator like Climb 4 Africa crucial for your 2026 or 2027 adventure.
Why Choose a 6-Day Kilimanjaro Trek?
Deciding to trek Kilimanjaro is a significant undertaking, and for many, a 6-day Kilimanjaro trek presents a compelling balance between achieving the summit and managing time or budget constraints. While longer itineraries, such as 7 or 8 days, generally offer better acclimatization and thus higher success rates, a 6-day option can be perfectly viable for well-prepared individuals. This duration is often chosen by those with limited vacation time or who prefer a more condensed challenge. It requires a strong commitment to physical training and a clear understanding of the route’s demands. The primary trade-off with a 6-day trek is the accelerated pace, which means less time for the body to adjust to the altitude. Therefore, selecting the right route within this timeframe becomes even more critical. We’ll explore how the Machame, Marangu, and Rongai routes stack up when undertaken over six days, helping you make an informed decision for your 2026 or 2027 climb.
Comparing 6-Day Kilimanjaro Treks: Machame vs. Marangu vs. Rongai
When planning a trekking Kilimanjaro 6 días, the choice between the Machame, Marangu, and Rongai routes significantly impacts your experience. Each route has unique characteristics that influence acclimatization, scenery, difficulty, and the overall success rate for a shorter itinerary. For a 6-day trek, the Machame route is often considered the most scenic and offers a good acclimatization profile within the limited timeframe, though it’s more challenging than Marangu. The Marangu route is distinct for its hut accommodations, which some trekkers prefer over camping, but its direct ascent can be harder on the body. Rongai, approaching from the north, provides a different perspective and can be a good option in wetter seasons, though its 6-day itinerary is also quite fast-paced. Understanding these differences is key to selecting the best fit for your personal capabilities and expectations for a 2026 or 2027 expedition.
The 6-Day Machame Route: Scenery and Acclimatization
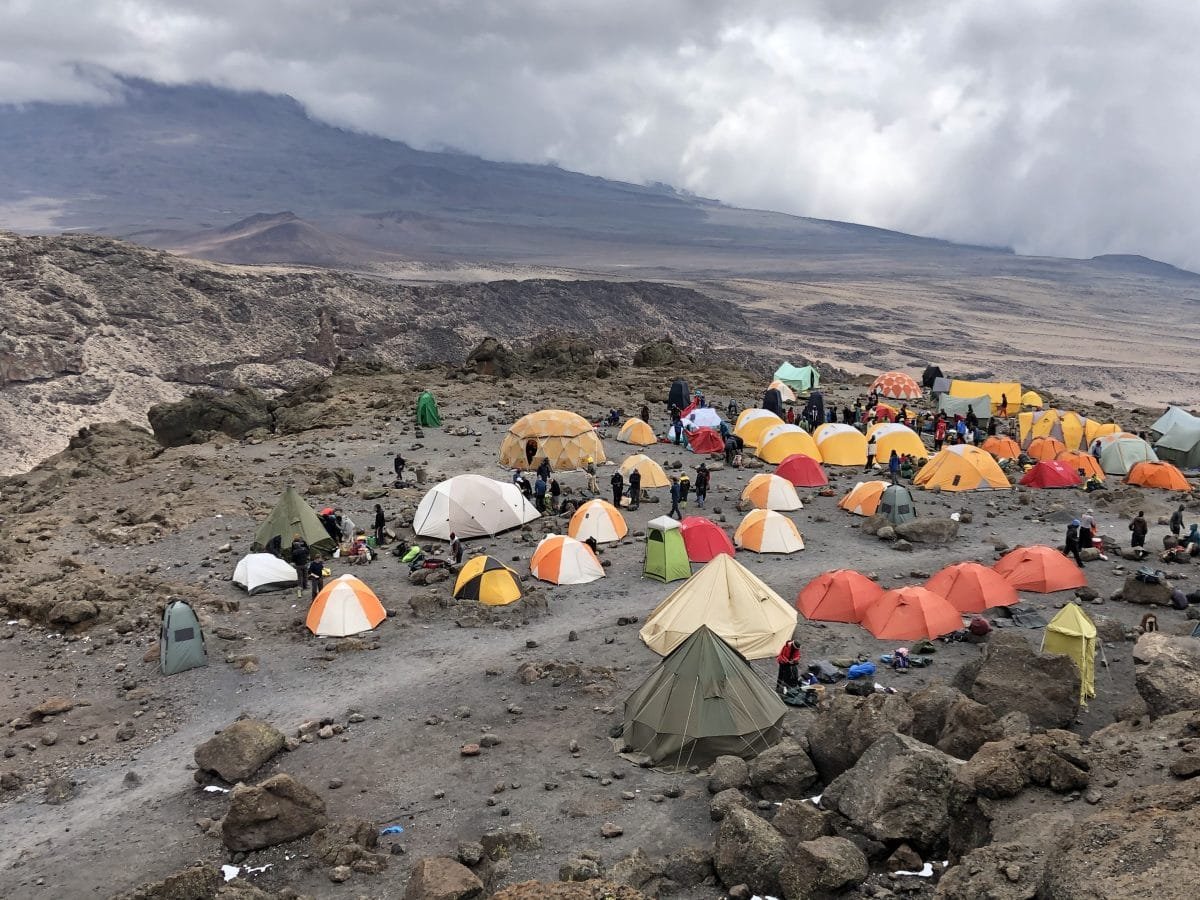
The Machame route, often nicknamed the ‘Whiskey Route,’ is highly popular for its stunning vistas and excellent acclimatization profile, even on a 6-day itinerary. It ascends gradually, allowing your body more time to adjust to the increasing altitude, which is vital for summit success. On a 6-day Machame trek, you’ll traverse diverse landscapes, from rainforests to moorlands, alpine deserts, and finally the arctic zone near the summit. The route offers a ‘climb high, sleep low’ strategy on several days, which is beneficial for acclimatization. However, it is a more physically demanding route than Marangu, involving some steep ascents and descents. Accommodation on Machame is exclusively camping, meaning you’ll be sleeping in tents throughout the climb. For a 6-day Machame climb, this route is a strong contender if you are physically fit and prioritize scenery and a relatively better acclimatization curve, acknowledging that the shorter duration still presents a challenge.
The 6-Day Marangu Route: Huts and Direct Ascent
The Marangu route, famously known as the ‘Coca-Cola’ or ‘tourist’ route, is the only one offering accommodation in comfortable mountain huts rather than tents. This makes it an attractive option for trekkers who prefer a bit more comfort and aren’t keen on camping. However, the 6-day Marangu itinerary is characterized by its direct and steep ascent. It offers fewer opportunities for ‘climb high, sleep low’ acclimatization compared to Machame or Rongai. This direct approach means you gain altitude quickly, which can increase the risk of altitude sickness. The scenery is also considered less varied than on other routes, as you ascend and descend the same path. Despite these challenges, the hut accommodation is a significant draw for many. If comfort and shelter are high priorities, and you are confident in your ability to acclimatize quickly, a 6-day Marangu trek might be suitable, but it’s crucial to be aware of the increased acclimatization challenge over a shorter period.
The 6-Day Rongai Route: Northern Views and Dry Conditions
The Rongai route is the only route that approaches Kilimanjaro from the north, near the Kenyan border. This offers a unique perspective and different scenery, often described as more remote and less crowded than the southern routes. A key advantage of Rongai is that it passes through drier terrain, making it an excellent choice during the rainy seasons (typically April-May and November). For a 6-day Rongai trek, it presents a good balance of acclimatization and scenery, though it is still a fast-paced ascent. Like Machame, Rongai uses camping for accommodation. The route offers a steady ascent, and its proximity to the equator means you can often see Mount Meru. While generally considered less strenuous than Machame in terms of technical difficulty, the 6-day duration still demands good fitness and acclimatization awareness. It’s a solid choice for those seeking a different view and potentially better weather during shoulder seasons for their 2026 or 2027 climb.
Detailed Route Itinerary Comparison for 6 Days
When you decide on a trekking Kilimanjaro 6 días, the day-by-day breakdown is essential for understanding the physical demands and acclimatization potential. Each route, even within a 6-day timeframe, has a specific sequence of ascents and descents that dictates the overall experience and the likelihood of reaching Uhuru Peak. Here, we detail the typical 6-day itineraries for Machame, Marangu, and Rongai, highlighting key points for each day.
Machame Route: 6-Day Itinerary Breakdown
The 6-day Machame route is a popular choice, offering a good balance of acclimatization and scenic progression. It’s considered one of the most beautiful routes, with a high success rate among experienced trekkers, even in this compressed timeframe. However, it’s crucial to understand that 6 days is on the shorter side for Machame, and longer trips (7-8 days) are generally recommended for optimal acclimatization.
Day 1: Machame Gate (1,800m/5,905ft) to Machame Camp (3,050m/10,007ft)
Distance: 11 km / 7 miles
Time: 5-7 hours trekking
Habitat: Rainforest
The trek begins after a drive to Machame Gate. The initial hike is through a dense rainforest, offering a lush and shaded environment. The path is well-maintained but can be muddy. You’ll reach Machame Camp in the late afternoon, where you’ll set up camp.
Day 2: Machame Camp (3,050m) to Shira Camp (3,850m/12,631ft)
Distance: 5 km / 3 miles
Time: 4-6 hours trekking
Habitat: Moorland
Today’s trek takes you out of the forest and into the moorland zone. The path involves a steep climb in parts, but the views start to open up. You’ll reach Shira Camp, a scenic spot on the Shira Plateau, offering spectacular sunset views.
Day 3: Shira Camp (3,850m) to Lava Tower (4,600m/15,091ft) then to Barranco Camp (3,950m/12,959ft)
Distance: 10 km / 6 miles
Time: 6-8 hours trekking
Habitat: Alpine Desert
This is a crucial acclimatization day. You’ll ascend steadily towards Lava Tower, a prominent volcanic plug. After a break and lunch at Lava Tower, you’ll descend to Barranco Camp. This ‘climb high, sleep low’ strategy is vital for helping your body adjust to the altitude.
Day 4: Barranco Camp (3,950m) to Karanga Camp (4,000m/13,123ft)
Distance: 5 km / 3 miles
Time: 3-5 hours trekking
Habitat: Alpine Desert
Today involves navigating the famous Great Barranco Wall. It’s a steep scramble, but manageable with guidance. After overcoming the wall, the terrain becomes less steep as you traverse towards Karanga Camp, situated in a valley. This is a shorter trekking day, allowing for rest.
Day 5: Karanga Camp (4,000m) to Barafu Camp (4,600m/15,091ft)
Distance: 3 km / 2 miles
Time: 3-5 hours trekking
Habitat: Alpine Desert
This is another relatively short trekking day, but it involves a significant ascent to Barafu Camp. Barafu Camp is located on a rocky ridge and serves as the base for your summit attempt. You’ll have an early dinner and attempt to rest before the final push.
Day 6: Barafu Camp (4,600m) to Uhuru Peak (5,895m/19,341ft) and down to Mweka Camp (3,100m/10,170ft)
Distance: 17 km / 10.5 miles (summit and descent)
Time: 7-8 hours (ascent), 4-6 hours (descent)
Habitat: Arctic
The summit attempt begins around midnight. You’ll trek up steep scree slopes under the stars, reaching Stella Point on the crater rim around sunrise. From Stella Point, it’s a further 1-2 hour walk to Uhuru Peak, the highest point in Africa. After celebrating your achievement, you’ll descend steeply back to Barafu Camp for a short rest before continuing down to Mweka Camp, where you’ll spend your final night on the mountain.
Marangu Route: 6-Day Itinerary Breakdown
The 6-day Marangu route is one of the shortest options and is known for its hut accommodations. While convenient, this direct ascent can make acclimatization more challenging compared to longer routes or even the 6-day Machame. It’s often chosen for its perceived ease due to the huts, but the physical demand of the summit push is substantial.
Day 1: Marangu Gate (1,800m/5,905ft) to Mandara Huts (2,700m/8,858ft)
Distance: 8 km / 5 miles
Time: 3-5 hours trekking
Habitat: Rainforest
After registering at Marangu Gate, you begin your trek through the dense rainforest. The path is well-maintained and relatively gentle. You’ll arrive at Mandara Huts, comfortable cabins offering shared facilities, in the afternoon.
Day 2: Mandara Huts (2,700m) to Horombo Huts (3,700m/12,139ft)
Distance: 12 km / 7.5 miles
Time: 5-7 hours trekking
Habitat: Moorland
Today’s trek takes you out of the forest and into the moorland zone. The trail gradually ascends, offering increasingly open views. You’ll reach Horombo Huts, which are situated in a beautiful alpine meadow, providing a stark contrast to the rainforest below.
Day 3: Horombo Huts (3,700m) – Acclimatization Day or Day Trip to Zebra Rocks
Distance: Varies (e.g., 2-4 km round trip)
Time: 2-4 hours trekking
Habitat: Moorland/Alpine Desert
This day is dedicated to acclimatization. You can choose to rest at Horombo Huts or take a short hike up towards Zebra Rocks (around 4,000m) and back. This ‘climb high, sleep low’ activity is crucial for helping your body adapt to the altitude before proceeding higher.
Day 4: Horombo Huts (3,700m) to Kibo Huts (4,700m/15,419ft)
Distance: 10 km / 6 miles
Time: 6-8 hours trekking
Habitat: Alpine Desert
This is a long and challenging day as you ascend through the alpine desert towards Kibo Huts, located at the base of the Kibo cone. The landscape becomes increasingly barren and stark. You’ll arrive at Kibo Huts in the afternoon and have an early dinner to prepare for the summit push.
Day 5: Kibo Huts (4,700m) to Uhuru Peak (5,895m) and down to Horombo Huts (3,700m)
Distance: 16 km / 10 miles (summit and descent)
Time: 10-15 hours trekking (summit and descent)
Habitat: Arctic
The summit attempt begins around midnight. You’ll trek up steep scree slopes, aiming to reach Gilman’s Point on the crater rim by sunrise. From Gilman’s Point, it’s a further 1-2 hour walk to Uhuru Peak. After celebrating, you’ll descend back to Kibo Huts for a brief rest before continuing down to Horombo Huts. This is an extremely long and demanding day.
Day 6: Horombo Huts (3,700m) to Marangu Gate (1,800m)
Distance: 20 km / 12.5 miles
Time: 5-7 hours trekking
Habitat: Moorland/Rainforest
After breakfast, you’ll descend through the moorland and back into the rainforest. The hike is pleasant and relatively straightforward. You’ll reach Marangu Gate in the afternoon, where you’ll meet your transport back to Arusha.
Rongai Route: 6-Day Itinerary Breakdown
The 6-day Rongai route offers a unique approach from the north and is often considered a good option for those concerned about rain, as it traverses a drier side of the mountain. It provides a steady ascent with good acclimatization potential within the limited timeframe, though like all 6-day treks, it’s a fast pace.
Day 1: Rongai Gate (1,950m/6,397ft) to Simba Camp (2,600m/8,530ft)
Distance: 6 km / 4 miles
Time: 3-4 hours trekking
Habitat: Farmland/Pine Forest
Your trek begins at Rongai Gate, near the Kenyan border. After park formalities, you’ll hike through farmland and pine forests. The trail is relatively gentle, and you’ll reach Simba Camp, a pleasant campsite with good views, in the afternoon.
Day 2: Simba Camp (2,600m) to Kikelewa Caves (3,600m/11,811ft)
Distance: 10 km / 6 miles
Time: 6-8 hours trekking
Habitat: Moorland
Today involves a more significant ascent into the moorland zone. The path becomes steeper as you head towards Kikelewa Caves, a scenic camping spot with excellent views of the surrounding landscape and Mawenzi peak.
Day 3: Kikelewa Caves (3,600m) to Mawenzi Tarn Camp (4,300m/14,107ft)
Distance: 5 km / 3 miles
Time: 4-6 hours trekking
Habitat: Alpine Desert
This day takes you across scree and rocky terrain to Mawenzi Tarn Camp, situated in a dramatic cirque beneath the jagged peaks of Mawenzi. The views here are spectacular, and the altitude gain is considerable.
Day 4: Mawenzi Tarn Camp (4,300m) – Acclimatization Day or Day Trip
Distance: Varies
Time: 3-5 hours trekking
Habitat: Alpine Desert
An acclimatization day is often included here on longer Rongai itineraries, but on a 6-day trek, this day might be used for a shorter hike to a higher point and back, or it might be skipped in favour of a more direct push. If included, it allows your body to adjust to the altitude before the final ascent. This can involve hiking towards the saddle between Kibo and Mawenzi.
Day 5: Mawenzi Tarn Camp (4,300m) to Kibo Huts (4,700m/15,419ft)
Distance: 7 km / 4.5 miles
Time: 5-7 hours trekking
Habitat: Alpine Desert
You’ll traverse the ‘saddle’ area between Mawenzi and Kibo, a high-altitude desert landscape. The trek leads you to Kibo Huts, the same staging camp used by the Marangu route for the summit attempt. This day prepares you for the final push.
Day 6: Kibo Huts (4,700m) to Uhuru Peak (5,895m) and down to Horombo Huts (3,700m) or Mandara Huts (2,700m)
Distance: 16 km / 10 miles (summit and descent)
Time: 10-15 hours trekking (summit and descent)
Habitat: Arctic
The summit attempt begins around midnight. You’ll ascend steep scree to Gilman’s Point on the crater rim, then continue to Uhuru Peak. After summiting, you’ll descend back past Kibo Huts, often continuing down to Horombo Huts for the night, or even further to Mandara Huts on a very long day, depending on the operator’s itinerary and your energy levels.
Acclimatization Strategies for a 6-Day Climb
When undertaking a trekking Kilimanjaro 6 días, acclimatization is paramount. A shorter itinerary inherently means a faster ascent, placing greater emphasis on how well your body adapts to the thinning air. The principle of ‘pole pole’ (slowly, slowly) becomes even more critical, and understanding acclimatization strategies is not just helpful, it’s essential for safety and success. Generally, 6-day Kilimanjaro treks have lower success rates compared to their 7 or 8-day counterparts. This is primarily because the body has less time to adjust to the decreasing oxygen levels as you gain altitude. Altitude sickness, or Acute Mountain Sickness (AMS), can affect anyone, regardless of fitness level. Symptoms can range from headaches and nausea to more severe conditions like HAPE (High Altitude Pulmonary Edema) and HACE (High Altitude Cerebral Edema).
Key Acclimatization Principles for a 6-Day Trek:
- ‘Pole Pole’ (Slowly, Slowly): This Swahili phrase is the mantra of Kilimanjaro climbers. On a 6-day trek, it means maintaining a slow, steady pace throughout the day. Avoid rushing, especially on the ascent. Your guide will ensure you walk at a pace that allows for optimal oxygen intake.
- ‘Climb High, Sleep Low’: This strategy involves ascending to a higher altitude during the day and then descending to a lower altitude to sleep. This helps your body acclimatize more effectively. Routes like Machame and Rongai incorporate this more naturally into their itineraries. On a 6-day Marangu trek, this is harder to achieve due to the direct ascent, making the acclimatization day at Horombo Huts particularly important.
- Hydration: Drinking plenty of water (3-4 liters per day) is crucial. Dehydration can mimic or worsen altitude sickness symptoms.
- Avoid Alcohol and Smoking: These substances can impair acclimatization.
- Listen to Your Body and Your Guide: It’s vital to communicate any symptoms of altitude sickness to your guide immediately. They are trained to assess your condition and make decisions regarding your safety. On a 6-day trek, guides are vigilant because the margin for error is smaller.
- Proper Pre-Trek Training: While not a direct acclimatization strategy, being physically fit significantly aids your body’s ability to cope with the stresses of altitude and exertion. Cardiovascular fitness and leg strength are key.
For a 6-day Kilimanjaro trek, choosing a route that offers better acclimatization profiles, like Machame or Rongai, is often advisable, even if it means a bit more physical exertion. The Marangu route’s hut accommodation is appealing, but the rapid ascent requires careful monitoring for AMS. Operators like Climb 4 Africa emphasize these acclimatization principles in their pre-trek briefings and on the mountain, ensuring your safety is the top priority for your 2026 or 2027 climb.
Scenery and Terrain: What to Expect on Each 6-Day Route
The visual journey on Kilimanjaro is as much a part of the experience as the summit itself. Each route offers a distinct progression through different ecological zones, from lush rainforests at the base to the stark, arid landscapes near the peak. For a trekking Kilimanjaro 6 días, understanding these scenic differences can help you choose the route that best matches your expectations. The terrain also varies, impacting the physical demands.
Machame Route: Diverse Ecosystems and Dramatic Views
The Machame route is widely praised for its stunning scenery and varied terrain. Your 6-day trek will take you through:
- Rainforest: The initial days are characterized by dense, verdant forests, often misty and teeming with plant life. The path can be muddy and slippery.
- Moorland: As you ascend, the forest gives way to open moorlands dotted with giant heather, senecios, and lobelias. Views begin to open up, offering glimpses of the plains below.
- Alpine Desert: This is a stark, arid landscape with sparse vegetation, volcanic rock, and scree. The air is thin, and the sun can be intense.
- Arctic Zone: The highest reaches are characterized by ice and snow, with the dramatic crater rim and glaciers of Kilimanjaro.
The terrain on Machame involves significant ascents and descents, including the challenging Barranco Wall scramble, which adds an element of adventure. The ‘climb high, sleep low’ approach means you experience varied altitudes daily.
Marangu Route: Forested Paths and Expansive Views
The Marangu route, while less varied in its ascent path, still offers beautiful scenery, especially on the way up:
- Rainforest: Similar to Machame, the lower sections are covered in dense rainforest, offering a pleasant start to the trek.
- Moorland: This zone provides more open views and the characteristic giant heathers and unique flora.
- Alpine Desert: The landscape becomes increasingly barren as you gain altitude, with rocky terrain dominating.
- Arctic Zone: The summit area is cold, icy, and windswept.
A key difference for Marangu is that you ascend and descend the same path. The terrain is generally less rugged than Machame, with fewer steep scrambles, making it feel less technically demanding on the way up, but the direct ascent can be taxing. The primary appeal here is the scenery viewed from the huts and the consistent, though less varied, landscape.
Rongai Route: Northern Vistas and Unique Landscapes
The Rongai route offers a distinct visual experience as it approaches from the north:
- Farmland and Forest: The initial trek is through cultivated land and then into pine forests, offering a gentle start.
- Moorland: This zone transitions into open moorlands, with unique high-altitude vegetation.
- Alpine Desert: The terrain becomes rocky and arid, with scree slopes becoming more common as you approach the saddle and Kibo.
- Arctic Zone: The summit region is characterized by ice, snow, and the volcanic crater.
The scenery on Rongai is often described as more remote and wild. You get excellent views of the flat plains of Kenya to the north and Mount Meru to the west. The terrain is generally less steep than Machame, with a more gradual overall ascent, though the final push to the summit is still challenging.
When choosing a 6-day Kilimanjaro trek, consider which scenery and terrain best suit your preferences. Machame offers dramatic, varied landscapes and more challenging terrain. Marangu provides comfort with its huts and a more direct, less varied path. Rongai offers a unique northern perspective and a drier environment.
Accommodation Differences: Camping vs. Huts
One of the most significant differentiators between Kilimanjaro routes, especially relevant for a trekking Kilimanjaro 6 días, is the type of accommodation provided. This choice impacts comfort, weight carried by porters, and the overall trekking experience. The three main routes you’re considering – Machame, Marangu, and Rongai – differ starkly in this regard.
Camping Routes (Machame, Rongai)
The Machame and Rongai routes are designated as camping routes. This means that throughout your trek, you will be sleeping in tents. This style of accommodation offers several advantages and considerations:
- in-depth Experience: Camping provides a more direct connection with the mountain environment. You wake up to incredible views right outside your tent and experience the full range of mountain weather.
- Porter Support: On camping routes, porters carry the tents, cooking equipment, food, and your personal gear. You only need to carry a daypack with essentials.
- Dedicated Campsites: Campsites are designated and equipped with basic facilities, often including pit latrines. Your camping crew sets up your tent, a mess tent for meals, and a toilet tent.
- Potential for Cold: Nights can be very cold, especially at higher altitudes. Proper sleeping gear (a warm sleeping bag and mat) is essential.
- Environmental Impact: Reputable operators follow Leave No Trace principles to minimize environmental impact.
For a 6-day Kilimanjaro trek on Machame or Rongai, camping is standard. It requires trekkers to be comfortable with basic facilities and sleeping outdoors.
Hut Route (Marangu)
The Marangu route stands out as the only route on Kilimanjaro that offers accommodation in mountain huts. This ‘Coca-Cola’ route is often chosen for its perceived comfort:
- Comfort and Shelter: Huts provide solid shelter from the elements and are equipped with beds and mattresses. They typically have communal dining areas and basic toilet facilities.
- Less Porter Load: Since tents and sleeping gear aren’t carried, the porter load is generally lighter, though guides and cooks still accompany you.
- Convenience: For those who dislike camping or are concerned about cold nights, the huts offer a significant advantage.
- Less in-depth: Some trekkers find the hut experience less wild and connected to nature compared to camping. You are often sharing rooms with other trekkers.
- Popularity: Due to its unique accommodation, Marangu is often the busiest route, which can affect the atmosphere at the huts.
When planning your trekking Kilimanjaro 6 días, the accommodation choice is a key factor. If comfort and shelter are primary concerns, the 6-day Marangu route is the only hut option. However, if you seek a more traditional mountain experience and potentially better acclimatization on a shorter trek, the camping options of Machame or Rongai might be more suitable, provided you are prepared for tent living.
Difficulty and Physical Preparation for a 6-Day Trek
Embarking on a trekking Kilimanjaro 6 días is a serious physical challenge, regardless of the route chosen. While Kilimanjaro is not technically difficult in terms of climbing (no ropes or ice axes are typically needed, except on the summit ice fields), the difficulty stems from the extreme altitude, rapid ascent, and long trekking days. For a 6-day itinerary, the pace is accelerated, meaning less time for your body to adapt. This makes preparation absolutely crucial for success and safety.
Understanding the Difficulty
- Altitude: The primary challenge is the altitude. Reaching Uhuru Peak at 5,895 meters (19,341 feet) exposes you to very low oxygen levels. Altitude sickness is a significant risk, and its effects can render even the fittest individuals unable to continue.
- Pace: A 6-day trek means covering substantial distances and elevation gains in a short period. This requires excellent cardiovascular fitness and endurance.
- Terrain: While not technical climbing, the terrain can be steep, rocky, and covered in scree, especially on summit night. This puts considerable strain on your legs and joints.
- Summit Night: The final ascent to Uhuru Peak is the most demanding part of any Kilimanjaro trek. It begins around midnight, involves trekking for 7-8 hours in the dark, cold, and thin air, and often covers 10-12 km (6-7.5 miles) upwards to the summit and then back down to camp.
Physical Preparation Recommendations
To maximize your chances of success on a 6-day Kilimanjaro trek, a comprehensive training program is recommended for at least 2-3 months prior to your climb:
- Cardiovascular Training: Engage in regular aerobic activities such as running, cycling, swimming, or brisk hiking. Aim for at least 3-4 sessions per week, building up to longer durations (90 minutes or more).
- Hiking with a Pack: The best preparation for trekking is hiking. Try to do at least one long hike (4-6 hours) per week, ideally on varied terrain (hills, stairs). Gradually increase the weight in your backpack to simulate carrying your daypack with essentials.
- Strength Training: Focus on leg strength (squats, lunges, calf raises) and core strength. Strong legs will help you manage the steep ascents and descents, and a strong core improves balance and endurance.
- Stair Climbing: If you don’t have access to hills, stair climbing (in a building or on a stair machine) is an excellent substitute for simulating steep ascents.
- Mental Preparation: Understand that the trek will be challenging. Be prepared for discomfort, cold, and fatigue. A positive mental attitude is as important as physical fitness.
For a trekking Kilimanjaro 6 días, especially routes like Machame which involve more scrambling and varied terrain, good physical conditioning is non-negotiable. Even on Marangu, the rapid altitude gain requires a strong, resilient body. Operators like Climb 4 Africa can provide specific advice on training regimes to help you prepare adequately for your 2026 or 2027 adventure.
When to Trek Kilimanjaro: 6-Day Route Suitability by Season (2026-2027)
Choosing the right time of year for your trekking Kilimanjaro 6 días can significantly influence your experience, affecting weather conditions, crowds, and even the difficulty of the trek. Kilimanjaro has two main dry seasons and two main wet seasons, each with its own characteristics. For a shorter 6-day itinerary, timing is especially important as weather can play a more critical role in your comfort and progress.
Kilimanjaro Seasons Overview
- Dry Season (January-March): Generally considered the best time to climb. Clear skies, good visibility, and moderate temperatures. This period is popular, so expect more trekkers.
- Shoulder Season (April-May): These are the main rainy months. Expect frequent rain, mist, and potentially snow at higher altitudes. Trails can be muddy and slippery. While challenging, it’s less crowded and can offer lush scenery.
- Dry Season (June-October): Another excellent period for climbing. Clear skies, cooler temperatures (especially at night), and good visibility. This is a peak season, alongside January-March.
- Shoulder Season (November-December): This period sees shorter rains, often in the form of afternoon showers. It’s a good time for those seeking fewer crowds and can still offer good trekking conditions.
Route Suitability for 6-Day Treks by Season
January – March (Dry Season)
Best for: All routes (Machame, Marangu, Rongai).
Conditions: Cold but clear. Excellent visibility for summit views. Trails are generally in good condition. This is a prime time for a 6-day Kilimanjaro trek, offering the highest chance of good weather. Expect more trekkers on popular routes like Machame and Marangu.
April – May (Long Rains)
Best for: Rongai Route.
Conditions: High rainfall, mist, and poor visibility. Trails can be very muddy and slippery, especially on the southern routes. The Rongai route, approaching from the north, is typically drier and might offer a more manageable experience. If you plan a trekking Kilimanjaro 6 días during this period, Rongai is the most sensible choice. Longer routes are generally preferred during the wet season to allow for more acclimatization and a slower pace.
June – October (Dry Season)
Best for: All routes (Machame, Marangu, Rongai).
Conditions: Clear skies, good visibility, and cooler temperatures. This is another peak season, so expect higher numbers of trekkers. July, August, and September are particularly busy. All routes are viable, but the faster pace of a 6-day trek means you should still be prepared for cold at altitude.
November – December (Short Rains)
Best for: Rongai Route, or Machame/Marangu with caution.
Conditions: Generally good, but expect some afternoon showers. Trails are usually manageable. Rongai remains a drier option. If choosing Machame or Marangu for a 6-day Kilimanjaro trek in these months, be prepared for potential rain, especially on lower slopes.
Planning for 2026-2027:
For those planning their 6-day Kilimanjaro trek in 2026 or 2027, aiming for the dry seasons (January-March and June-October) will generally provide the most favorable weather. If your dates fall within the rainy seasons, the Rongai route is often the most recommended choice for a shorter trek due to its drier approach. Regardless of the season, remember that weather on Kilimanjaro can be unpredictable, and a 6-day itinerary is always a faster pace, demanding good preparation and flexibility.
Understanding the Cost of a 6-Day Kilimanjaro Trek
The cost of a trekking Kilimanjaro 6 días can vary significantly depending on the tour operator, the route chosen, and the inclusions. While a 6-day trek might seem more budget-friendly due to its shorter duration, it’s essential to understand what drives the costs and to compare operators carefully. A reputable company like Climb 4 Africa ensures that all essential costs are covered, prioritizing safety and quality support.
Key Cost Components
- Park Fees: These are government-mandated fees for entry into Kilimanjaro National Park, including camping/hut fees, rescue fees, and crater service fees. These are usually a substantial portion of the overall cost and are non-negotiable.
- Guide and Porter Wages: Fair wages for your mountain crew are critical. Reputable operators pay their staff well, ensuring a motivated and professional team. This is a significant ethical consideration.
- Food and Water: All meals on the mountain, from breakfast on day one to lunch on the final day, are provided. This includes fresh, nutritious food prepared by your cook.
- Equipment: While you bring your personal gear, the operator provides tents, sleeping mats, cooking equipment, and other camp necessities. High-quality, well-maintained equipment is essential for comfort and safety.
- Accommodation: This includes the mountain huts (for Marangu) or camping fees and services.
- Transport: Transfers from the airport to your hotel in Arusha, and from Arusha to the mountain gate and back.
- Logistics: Operating costs, permits, emergency equipment (like oxygen cylinders and a hyperbaric chamber), and support staff.
Check Availability for Trekking Kilimanjaro 6 Días: Machame, Marangu Y Rongai 2026-2027
Ready to compare dates, prices, and the best option for your group? Send the package name and travel month so the team can reply with a clear quote, availability, and what is included.
12 closely related packagesKilimanjaro Climb Machame Route : Expert Guide For Your Trek 2026-2027
Discover the ultimate guide to climbing Mount Kilimanjaro via the Machame Route for your 2026 or 2027 adventure. This comprehensive resource covers everything from choosing an itinerary and...
View package details
Monte Meru Y Kilimanjaro: Trekking En Tanzania 2026-2027
Discover the ultimate trekking experience in Tanzania by combining Mount Meru and Mount Kilimanjaro. This comprehensive guide covers everything from route selection and preparation to...
View package detailsWhat To Expect On Your First Kilimanjaro Trek: A Comprehensive Guide 2026-2027
Planning your first climb up Kilimanjaro? This comprehensive guide covers everything you need to know, from choosing a route and preparing your body to what daily life on the mountain is...
View package detailsWhy Do People Travel From Around The World To Climb Kilimanjaro? 2026-2027
Why Do People Travel From Around the World to Climb Kilimanjaro? is explained with current 2026-2027 planning, price, itinerary and booking information.
View package detailsWhy Do Thousands Of Travelers Visit Kilimanjaro Every Year? Your Expert Guide
Thousands of adventurers flock to Kilimanjaro each year, drawn by its status as Africa's highest peak and a bucket-list trekking challenge. This guide explores the compelling reasons behind...
View package detailsKilimanjaro Routes: Which Is Best For Your Climb? 2026-2027
Choosing the right Kilimanjaro route is crucial for a successful and enjoyable climb. This comprehensive guide compares the main routes, helping you select the best option for your...
View package details10 Mistakes To Avoid Before Climbing Kilimanjaro In 2026-2027
Planning a Kilimanjaro climb is exciting, but avoiding common mistakes is key to a successful and enjoyable experience. This guide details ten critical errors to sidestep, from choosing the...
View package details10 Most Challenging Mountains To Climb In Africa 2026-2027
While Mount Kilimanjaro is Africa's most famous peak, the continent harbors a spectrum of formidable mountains that test even seasoned climbers. This guide details the 10 most challenging...
View package details
Trek Mont Meru 4 Jours: Your Complete Guide 2026-2027
start a 4-day trek up Mount Meru, a challenging yet rewarding climb near Kilimanjaro. This guide covers routes, preparation, gear, and essential tips for your 2026-2027 expedition.
View package detailsWhy Is Climbing Kilimanjaro So Expensive? 2026-2027
Why Is Climbing Kilimanjaro So Expensive? is explained with current 2026-2027 planning, price, itinerary and booking information.
View package detailsWhy Is Kilimanjaro One Of The World’s Most Famous Mountains? Your Planning
Kilimanjaro's fame stems from its status as the highest free-standing mountain, its accessibility to non-technical climbers, its iconic snow-capped summit, and its location in a biodiverse...
View package details10 Things To Know Before Climbing Kilimanjaro 2026-2027
10 Things to Know Before Climbing Kilimanjaro is explained with current 2026-2027 planning, price, itinerary and booking information.
View package detailsNo related package matches those filters. Clear one or more filters to see the other topic-matched options.